![]()
![]()
*NOTE
TO THOSE WANTING TO PLAY IMPORTS ON THEIR PLAYSTATIONS*
Please
keep in mind that though game enhancers and/or modchips allow you to play
imports on your PlayStation, it will ONLY allow NTSC PlayStations to play
NTSC imports properly and PAL PlayStations to play PAL imports properly.
A NTSC machine MIGHT play a PAL import and a PAL machine MIGHT play an
NTSC import, but there will most likely be video output issues with the game. For the record, the major source
of imports (Japan) uses the NTSC video output system (as does North America)
albeit having a different country code encoded onto their discs.
For
more on the differences between NTSC and PAL, click here.
Getting
Started
Ok,
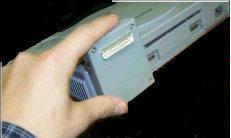
first of all, remove the "clip-off" cover on your Parallel I/O port on
the back of your PlayStation and insert the game enhancer. This picture
should give you an idea of where the game enhancer goes:
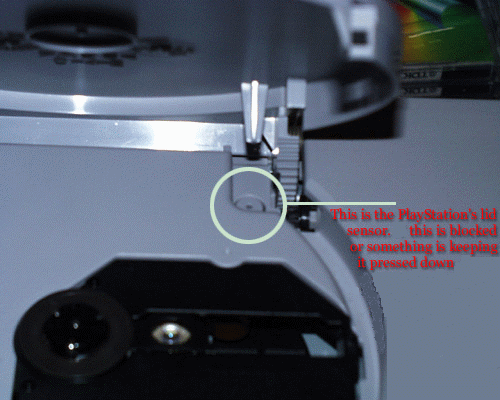
Next (this is the tricky part) open your CD tray on your PlayStation. Look to the top right hand corner of the tray, next to the gear mechanism. See a button that gets pressed when the door shuts? Well that button (called the "lid sensor") has a function. As most CD players, it stops the CD from spinning and the laser from going when pressed down. Unfortunately, unless the game permits you to change to another disc (a la multi-disc games), this will stop the PlayStation from working until you reboot. What we have to do is keep that button pressed so that the PlayStation thinks the door is always closed.
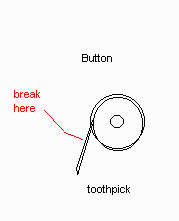
After pressing the button down and jamming the toothpick into the edge to hold it down, you should break the toothpick a few centimeters further, to allow the CD door to close.
To prevent the toothpick from becoming dislodged and the button from popping back up, I recommend opening and closing the CD tray door with the "OPEN" button held down so there is no click and therefore no vibration.
Now that this is done, you are prepared to use the feature. Make sure that the switch on the game enhancer is in the UP position and an original Sony PlayStation disc is in the drive (any original PlayStation disc will do, even the demo disc works fine). Power up (with the tray opened) and watch the disc. It will spin for around 5 seconds and then will stop. After the disc has stopped spinning, switch the real PlayStation disc with the copy/import. Close the CD tray and choose "Start Game" on the options screen (with the "O" button) and voila, your backup/import game should run perfectly.
But what about multi-disc backups/imports you ask?
Multi-disc (games with more than one disc) backups/imports require a procedure to change from disc to disc when using a game enhancer to play them. While it's rather simple to play multi-disc backup/import games that feature a save option at the end of each disc (like Final Fantasy 7 and 8) or games that allow you to start with/play any disc of the set (like Gran Turismo 2), it's more complicated to play multi-disc backup/import games that DO NOT have any of these features, and involves proper timing and technique to get it just right.
Certain multi-disc games such as Final Fantasy 7 and Final Fantasy 8 feature a save option at the end of each disc, as well as the option to boot up from any disc in the series (provided the user has saved their game at the end of the previous disc onto a memory card). This feature allows the user to save their game at the end of disc 1 to a memory card and either continue on to disc 2 OR power down and boot up from disc 2 while loading their saved game from their memory card. This method can be very useful when playing subsequent multi-disc PlayStation backups/imports that feature this save option. Every time you insert a new disc (or de-compress and re-compress the lid sensor), the PlayStation reads the country code off of the disc. Since backups (CD-R copies) do not have country codes recorded onto them, you can see how changing to the next disc in a set can pose a problem. Not to fear though, here are the ways to get past that problem:
Playing multi-disc backups/imports that feature a save option at the end of each disc
The first disc is loaded like any other backup/import (as described above). Once the user completes disc one, they will be prompted to either "Insert Disc 2" or to save their game onto their memory card. The user should then choose "Save Game" and save their game to their memory card. Once their game save information is saved, the user should then power down, boot up disc two as if it was a single disc backup/import (by using the method described above), and when prompted to do so, load the save game from the memory card to resume from where they left off. This method works perfectly without any real complications, and is much easier to do than the second option.
Playing multi-disc backups/imports that do NOT feature a save option at the end of each disc.
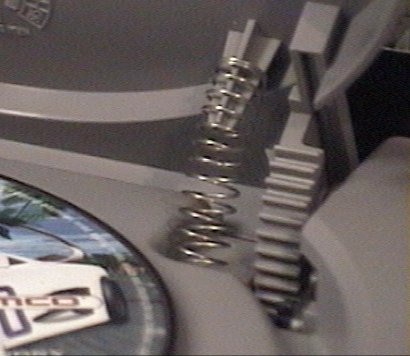
First off, the user will complete a disc in the set, and will then be prompted to insert the following disc in the set. Provided that the user is using a spring inside the PlayStation to compress the lid sensor, the user should then open the tray and remove the backup/import disc he/she was just playing. Instead of replacing it with the following disc in the series, the user should once again place any original Sony PlayStation disc in the PlayStation. Here's where the timing and technique come into play. The user should then place him/herself with his/her right hand holding the next disc in the set (the disc you are trying to continue your game with) and the left hand right next to the spring-compressed lid sensor. From here, the user should lift the spring off the lid sensor (de-compress the lid sensor) and then place the spring back where it was before (i.e.: on the lid sensor) re-compressing it. If necessary, press the "Start" button at this time. The original Sony PlayStation disc should start spinning, fluctuating speeds off and on. After about five seconds, the original cd in the drive will stop fluctuating speeds and maintain an even, uniform spin. The user should then quickly remove the spinning disc and replace it with the next backup/import disc in the set. If all goes well, the next disc in the set should resume the game from where you left off. It takes some timing and practice to get it just right. If you missed it and the following disc in the set did NOT boot up, do not worry, all is not lost. No need to reboot and start over from scratch, simply remove the next disc in the set from the PlayStation and hold it in your right hand. Place any original PlayStation disc back in the PlayStation and once again follow the steps above. If necessary, this can be repeated over and over until the next disc in the set boots up.
Playing an anti-modchip game using a game enhancer
If
you have been trying to play a backup/import on your PlayStation and have
been coming across either one of these screens:
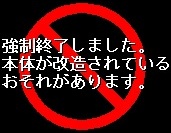
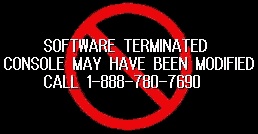
SOFTWARE TERMINATED. CONSOLE MAY HAVE BEEN MODIFIED. CALL 1-888-780-7690
then
the backup/import you are trying to play has an anti-modchip scheme. [For
more information on anti-modchip schemes, click here] The first thing
you should do in this case (NO, DO NOT CALL THE PHONE NUMBER ON THE SCREEN
:) is check the Game Enhancer Codes That Defeat Anti-Modchip
Schemes section of this website for unlock codes posted for your particular
game by following the link on that page. If there are no codes available
for your particular game, then there is another method of playing the anti-modchip
copy/import you are trying to play, but it involves proper timing and technique
to get it just right. The user should first load the backup/import as described
above, and note where exactly the error screen comes up in the loading cycle.
After this is noted in the user's mind, the user should then restart their PlayStation and once again load the backup/import as described
above. Make sure to leave the tray's lid open before pressing the "O" button
on "Start Game" . Here's where the timing and technique come into play.
The user should then place him/herself with his/her right hand holding
any original Sony PlayStation disc and the left hand ready to remove the
spinning disc in the tray. In the loading process, just before the error
screen comes up, the user should quickly remove the spinning disc and replace
it with any original Sony PlayStation disc. The original Sony PlayStation
disc should start spinning, fluctuating speeds off and on. After about
five seconds, the original CD in the drive will stop fluctuating speeds
and maintain an even, uniform spin. The user should then once again quickly
remove the spinning disc and replace it with the backup/import he/she is
trying to load. If all goes well, the game should start up normally.
Try not to get frustrated as it takes some timing and practice to get it
just right.